Form submission React + Node.js
Learn how to create an API endpoint with Node.js and make a post request to it from a React application.

I recently started working as a Full Stack Developer and I am looking forward to share my experiences and to keep learning as much as I can.
Hello! In this article we'll cover how to submit a form in React, and receive that data on our own api endpoint 😁 Sounds like fun? Let's get started!
Some previous knowlege you may need to follow along:
- React - create-react-app
- useState hook
- Node.js - Express
Building the API
We'll start by building the API, and once it is done, we'll move to the front-end.
We first need to type npm init -y on our terminal, this will generate a package.json with basic information and configuration for our project.
Next, we have to create an index.js file ( you can name it as you want ) on the root of our directory.
Now it is time to install express ( node.js framework ) and CORS, which are the dependencies we are going to use. To do so, we type npm i express cors on the terminal.
The next step is to configurate some stuff on our file.
const express = require('express');
const app = express();
const cors = require('cors');

app.use(cors());
app.use(express.urlencoded({ extended: true }));
app.use(express.json());

app.listen(3001, () => {
  console.log('Server up');
});
Here, in the first two lines, we are importing express and we are storing the express instance on the app variable.
Then, we import cors, which is a middleware that help us to enable cross-origin resource sharing (cors). This way, we will be able to make a request to our API from our front end.
To tell our app to store the parsed data on the body object, we use the middleware urlencoded, and we set the extended option to true so it enables more than just strings to be passed on the body object.
Next, we are telling our app that we are going to receive json objects on our requests. We do this by using the express built-in json() method.
And last but not least, we tell our app the port in which we want it to run, in this case http://localhost:3001.
Creating the endpoint
It is time to create the endpoint that will receive the data that we are eventually going to send through a form in a React app.
const express = require('express');
const app = express();
const cors = require('cors');

app.use(cors());
app.use(express.urlencoded({ extended: true }));
app.use(express.json());

app.post('/data', (req, res) => {
  const { fullName, email } = req.body;
  console.log(fullName, email);
});

app.listen(3001, () => {
  console.log('Server up');
});
Let's explain what we did.
We are calling the post method of our express instance, which takes two arguments in this case, the route, and a callback.
The route is the url to which the user will have to make the request, in this case being http://localhost:3001/data.
Then, the callback takes two arguments, the request and the response. From that request we are interested on the body, where the info sended by the user will be.
From that body, we are destructuring the fullName and the email, these will be the fields we are going to ask for on the front-end.
Allright! Let's test it out! 🔍
- First we have to run our server, and we do this by running node index.js on the terminal.
- Open Postman or Insomnia, and type http://localhost:3001/data on the url field.
- Then, on the body tab, select the x-www-form-urlencoded option.
- Now just add the two fields that you have to pass to the endpoint and press "Send".
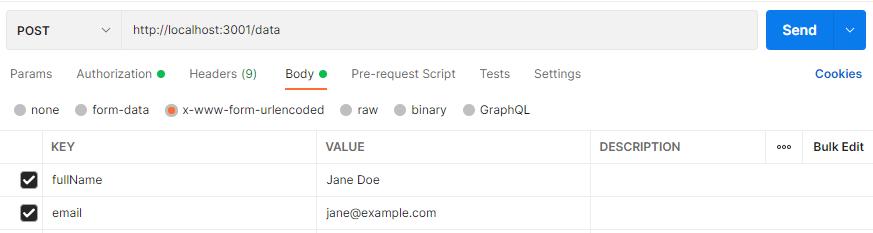 You should be seing those values on the code editor console!
 Great! 🙌 The only thing that is left to add is a response, so the user knows that we received de data successfully. To do this we have to make use of the json method of the response object on the callback.
const express = require('express');
const app = express();
const cors = require('cors');

app.use(cors());
app.use(express.urlencoded({ extended: true }));
app.use(express.json());

app.post('/data', (req, res) => {
  const { fullName, email } = req.body;
  console.log(fullName, email);
  res.json({
    ok: true,
  });
});

app.listen(3001, () => {
  console.log('Server up');
});
If you now restart your server, and send the request again, you should see that response on Postman!
 Our API is ready! Now it is time to build a user interface in React, Let's go! 🚀
Building the UI in React
Let's start with the basic layout on the App.js file. We need a form with two inputs and a button.
function App() {
  return (
    <div className="App">
      <form onSubmit={(e) => e.preventDefault()}>
        <div>
          <label htmlFor="fullName">Full name</label>
          <input type="text" placeholder="Full name" id="fullName" />
        </div>
        <div>
          <label htmlFor="email">Email</label>
          <input type="email" placeholder="Email" id="email" />
        </div>
        <div>
          <button>Send</button>
        </div>
      </form>
    </div>
  );
}

export default App;
Now we have to keep track of the value of the two inputs, so we can then send them to the API. For this we are going to use the useState hook.
import { useState } from 'react';

function App() {
  const [userData, setUserData] = useState({});

  return (
    <div className="App">
      <form onSubmit={(e) => e.preventDefault()}>
        <div>
          <label htmlFor="fullName">Full name</label>
          <input
            type="text"
            placeholder="Full name"
            id="fullName"
            onChange={(e) =>
              setUserData({ ...userData, fullName: e.target.value })
            }
          />
        </div>
        <div>
          <label htmlFor="email">Email</label>
          <input
            type="email"
            placeholder="Email"
            id="email"
            onChange={(e) =>
              setUserData({ ...userData, email: e.target.value })
            }
          />
        </div>
        <div>
          <button>Send</button>
        </div>
      </form>
    </div>
  );
}

export default App;
Every time the user types a letter on the inputs, the state will be updated, so eventually we'll have an object with the fullName and email endpoints.
Now it is time to write the function that will take care of sending the data to the API and link it to the onClick attribute of our button.
async function handleClick() {
    const response = await fetch('http://localhost:3001/data', {
      method: 'POST',
      headers: {
        Accept: 'application/json',
        'Content-Type': 'application/json',
      },
      body: JSON.stringify(userData),
    });

    const data = await response.json();
    console.log(data);
  }

return (
    <div className="App">
      <form onSubmit={(e) => e.preventDefault()}>
        <div>
          <label htmlFor="fullName">Full name</label>
          <input
            type="text"
            placeholder="Full name"
            id="fullName"
            onChange={(e) =>
              setUserData({ ...userData, fullName: e.target.value })
            }
          />
        </div>
        <div>
          <label htmlFor="email">Email</label>
          <input
            type="email"
            placeholder="Email"
            id="email"
            onChange={(e) =>
              setUserData({ ...userData, email: e.target.value })
            }
          />
        </div>
        <div>
          <button onClick={handleClick}>Send</button>
        </div>
      </form>
    </div>
  );
}
We are making a post request to our API, and we are sending the data that was written on the inputs through the body of such request. The method stringify of the JSON instance allows us to convert a JavaScript value into a json string.
If we console log the result, we should see the json that we setted up on the backend.
 Awesome! We did it! 🥳
Now you could do whatever you want with that data that arrives to your API, for example store it on a Database to keep track of the users that make use of your app.
Thank you very much for reading, and I hope it was helpful!